Sunday, December 21, 2008

Honey & Walnut Muffins

Muffins, muffins and more muffins! I just need to finish up all the all-purpose flour and self raising flour still stacked in the cabinet. Exactly another week before the hassle of moving to the new place.

I just chanced upon a recipe that calls for exactly the ingredients that I would like to finish off. Walnuts, Honey, Flour - Honey & Walnut Muffins...Love the sound of it and decided to make this tonight.


Ingredients:
(Yields 4 big muffins)

Dry ingredients:
1 cup self-raising flour (sifted)
1/2 tsp salt
1/2 tsp ground cinnamon

Wet ingredients:
1/3 cup honey
3/8 cup milk
1/4 cup light olive oil
1 egg (lightly beaten)
3/8 cup walnuts (chopped & bake for 5 minutes at 170 deg Celsius)

for dusting:icing sugar


Method:

1) Preheat the oven to 170 deg Celcius.

2) Place 4 muffin paper cups into the muffin pans.

3) Mix dry ingredients in a large bowl. In another bowl, mix in the wet ingredients.

4) Stir in the walnuts into the wet ingredients.

5) Stir the wet mixtures into the dry mixtures gently using a wooden spoon. Do not overstir.

6) Spoon batter into muffin cups. Bake for 25-30 minutes, or until toothpick goes into the centre of the muffin comes out clean.

7) Dust muffins with sifted icing sugar and serve warm.


Outcome:
Right after scooping the batter into the cups, I placed each muffin with one raw walnut as decoration. The aroma was very strong during baking. I am delighted that I took extra mile to bake the walnut before adding it into the wet ingredients. It added crunchiness to the muffins. However, it came out slightly rubbery for the textures eventhough I did a minimum stirring. It was a bit too oily too.

Tuesday, December 16, 2008

Raisin Oatmeal Muffins

I am baking again out of boredom. I have been avoiding packing the house's stuffs and know well that the clock is ticking and we will be moving house in less than 2 weeks! I am not sure where to start from and it seems there is nothing much to bring over to the new place so I am still relaxing.

On the other hand, I have to do as much baking as I can before I leave as there will not be much opportunity for me to do it when I am at the new place. I am going to miss this house :(

I decided to bake Raisin Oatmeal Muffins as I would like to finish off the leftover raisins from my previous bakes. This recipe is adapted from "Simply Daily Recipes" and I have modified it to my very own version.


Ingredients:
(yields 7-8 muffins)

Wet Ingredients:
3/4 cup milk
1/3 cup oil
1 egg
1 tsp vanilla extract

Dry Ingredients:
3/4 cup golden raisins
1 cup all purpose flour
1 cup quick-cooking oats
5 tbsp brown sugar
3 tsp baking powder
1 tsp salt
1/2 tsp nutmeg
1/2 tsp cinnamon


Method:

1) Preheat oven to 200 deg Celsius.

2) Lightly grease the muffin pans with oil.

3) Mix wet and dry ingredients in separate bowls.

4) Add the wet ingredients to the dry ingredients and stir a few times for the batter to incorporate. Do not overstir. It is normal that the batter is lumpy.

5) Scoop into the muffin pan until 3/4 full of each cup if you do not like the dome effect.

6) Bake for 12-15 minutes or until toothpick poked into the centre of the muffin comes out clean.

7) Immediately remove from pan to cooling rack after baking.

Outcome:

I am not sure if it will turn out better when oil is substituted with butter. Somehow, I think the effect & taste will be better as I did not smell the strong aroma from these muffins while baking. May be next time I should try it out with butter. Furthermore, from the cracks on the muffins, i guess it is a bit dry on the top but the moisture still contains within the muffin. I am happy that the nutmeg and cinnamon made the muffins more flavourful. Overall, it is quite nice but there is still room for improvements for this recipe. :)

Saturday, December 13, 2008

Pancakes


As I will be moving house soon, I am trying to use up all the ingredients in the kitchen so that I do not have to pack and bring them along to the new place. As such, the normally well stored cabinets with dry food for my weekend breakfast are mostly cleared. I am thinking of cooking something easy and basic for tomorrow's breakfast. Pancakes!

I have never attempted pancake before and I have a brand new packet of all-purpose flour sitting in the cabinet. This will be good opportunity for me to start using it.


Ingredients:
(yields 3 servings)

1 cup all-purpose flour
2 1/2 tbsp sugar
1/2 tbsp baking powder
1/2 tsp salt
1 egg
1 1/2 cup milk
2 tbsp exra virgin olive oil
3 tbsp chocolate chips
Syrup for the toppings:
1/2 cup honey
3 tbsp butter (cubed)
1/2 tsp ground cinnamon

Method:

1) Mix dry ingredients (flour, sugar, baking powder & salt) in a bowl.

2) Mix wet ingredients (eggs, milk & oil) into dry ingredients and form the batter. Stir in the chocholate chips.

3) Pour the batter by 1/4 cupfuls onto a lightly greased hot non-sticked pan.

4) Turn when bubbles form on top & cook until second side is golden brown.

5) For the syrup, microwave, uncovered, on high until butter is melted and syrup is hot, stirring occasionally.

6) Serve with pancakes.


Outcome:

It is a little bit too rubbery for the texture. I had 2 pieces and had to stop eating it as they are not like those pancakes that I had before. I think it will be a long time before I start making pancakes again.

Wednesday, December 3, 2008

Plain Sweet Buns

Plain sweet buns have always been one of my favourites. In the past, I would prefer buns with fillings, the more the merrier. Nowadays, I find fillings too sweet for my liking and start liking simple and less heavy tasted stuffs.
I have always made sweet buns referencing to Happy Home Baking website. Normally it yielded me soft buns but somehow I was still not satisfied with the outcome for the texture as it staled the very next day.
Today, for a change, I am going to modify the recipe and see how it is going to turn out. Besides, I want to be more creative to come out with my own signature sweet buns. Again, I am going to depend on my bread maker to knead the dough. Hopefully I will not be disappointed with the results.

Ingredients:
(yields six buns)

1/2 cup water
1/2 egg (lightly beaten, leave the other half for egg wash)
25g unsalted butter
2 1/2 cup bread flour (sifted))
3/4 tsp instant yeast
4 tbsp sugar
1/2 tsp salt
1-2 tbsp whipping cream (optional)


Method:

The method was adapted from my Assorted Sweet Buns recipe without the filling step.

Note: I baked for around 20 minutes. Towards the end of the last 5 minutes, I lower down the temperature to 180 deg Celsius.

Outcome:


I prefer this recipe over my "Assorted Sweet Buns". However, it is a little bit too sweet for my taste. The texture is soft enough to last it until the 2nd day. However, it is not airy or light enough...Will try again and reupdate this post once I am satisfied with the outcome.

Monday, December 1, 2008

Banana Chocolate Chip Muffins

It has been quite a while since my last post. I was travelling for the past 2 weeks in China due to business trip. I missed my kitchen and blog so much. It was devastating enough travelling alone to complete the missions almost impossible but it was more depressing when I knew that I had to stop blogging about my adventures on baking, cooking and photography for these 2 weeks!
Here I am, after 2 full days of resting from the trip, I could not wait to start my hands again on baking. Today, I am going to bake Banana Choc Chip Muffins as I saw one very ripe banana hanging in my kitchen. I knew that if I did not do something about it, the banana will rot and end up in the waste bin.
Muffins are always the easiest to make and the best of all, it is fast. I reduced the ingredients as there was only one banana for the muffins. I used whipping cream as I had one box opened and I do not want to open a new box of milk just for 2-3 tablespoon as required by the recipe.

Ingredients:
(yields 2 muffins)

1 Cup cake flour
1 tsp baking powder
1/3 tsp baking soda
1/6 tsp salt
2 1/2 tbsp brown sugar
1 large banana
1/2 medium sized egg (lightly beaten)
3 tbsp cold whipping cream
25 g unsalted butter (melted and cooled)
chocolate chips (as desired)


Method:

1) Preheat oven to 180 deg. Celsius.

2) Sieve flour, baking powder, baking soda and salt into mixing bowl. Add in the chocolate chips.

3) Mash banana in another bowl and add in brown sugar, egg, whipping cream and butter. Mix well.

4) Stir in the wet mixture into the dry mixture with plastic/ wooden spatula. Stir a few times to incorporate the mixtures. DO NOT over stir as this will result in rubbery muffin texture.

5) Spoon batter into muffin paper cups and bake for 20-25 minutes or until toothpick inserted into the muffin comes out clean . I filled the cups until 85% full as I love the dome effect.

6) Let cool on the wire rack when done.


Outcome:

My intention was to make more than 2 muffins but the batter was only enough for 2. The batter was a bit less watery compared to all the previous muffins I have made before. It might be because I have substituted the milk with whipping cream. It did smell fantastic at the end of 10 minutes of the baking and it did look nice when it came out from the oven. I do hope that my curiosity of changing some of the ingredients will not spoil the muffins.

As it is already quite late in the night and I do not wish to eat it and later on blaming myself for gaining weight, I have to wait until tomorrow morning to taste them and further comment how it taste.

I tried the muffin this morning. It is delicious, with the right texture and taste, not too sweet and definitely will be one of my favourite choice of muffins! Yummy!

Wednesday, November 12, 2008

Vegetable Pizza Revisited

I think I have finally found the perfect pizza dough! I did some substitution to the ingredients on my own and i think I have innovated the dough which turned out amazing! What did I do? I just changed the milk with whipping cream and change the size of the pizza. Everything else followed exactly the same as the vegetable pizza recipe.

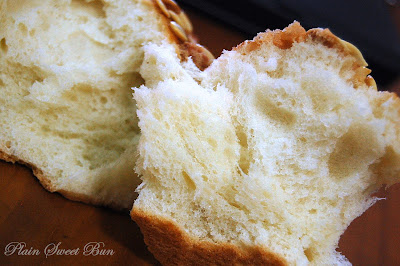
The very first difference I noticed was the texture of the dough. It was very elastic. While I was punching out the gas from the dough, it was not sticky at all, very manageable and I did not even need to flour the work surface. I did not expect just by changing the milk to whipping cream can yield me to such results, though I did worry for a while that the dough might be too dry.

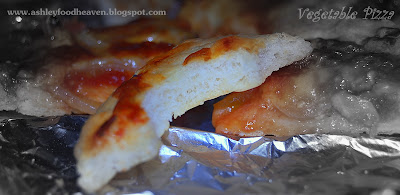
Ingredients were modified as the following:

Ingredients:
(yields 1 28 inched pizza)
1/4 cup cold whipping cream
1/4 cup water
1/2 tbs extra-virgin olive oil (I used pure olive oil)
1 1/2 cup bread flour
1 tbs sugar
1 tsp salt
1 tsp dry yeast
Extra olive oil (greasing the baking pan & for the crust before baking)

Toppings:

70 g Pizza sauce (I used pesto sauce)
1/2 Capsicum (Sliced thinly)
4 buttons Shiitake mushroom (Sliced thinly, stem removed)
1/2 head onion (Sliced thinly)
Grated Mozzarella Cheese
Minced garlic


Outcome:

To us, it was superb! I think the pesto sauce and the cream did make the pizza much more appetizing. Again, I received a note of compliment this morning on the kitchen table. I am glad that I took the initiative to change the ingredients and my boyfriend was bold enough to try my lab test. :)

Tuesday, November 11, 2008

Baked Stuffed Mushroom

I have a bunch of leftovers ingredients (shitake mushroom, capsicum & onions) in the refrigerator as I did not manage to finish using them when I made vegetable pizza last week. I thought that I should do something special with them instead of stir frying them.

I decided to bake stuffed mushroom topped with cheese after looking at a blog recommended by my BF (http://foodelicious.blogspot.com/). It is something that I have not attempted before but seemed not too complicated. I just browsed through some of the recipes available online, adapted some of the ingredients and came out with my own version of baked stuffed mushrooms.
As this is only a side dish for our dinner, I just made 6 buttons of mushrooms.


Ingredients:
(yields 6 buttons)

6 buttons Shitake Mushroom
2-3 Shallots (minced)
10 strips Capsicums (cut to small size)
1 tsp Oyster sauce
1 tsp "Shao Hsing" wine
1 tsp olive oil
Grated cheese


Method:

1) Soak the mushrooms for 15 minutes. Cut off the stems, chop stems into small pieces and put aside. Leave the cap uncut.

2) Preheat oven at 180 deg C.

3) Heat up pan with olive oil. For the filling, stir fry the minced shallots, capsicums and stems until fragrant, around 3-5 minutes.

4) Towards the end, add in oyster sauce and Shao Hsing wine and stir fry for another 1 minute. Put the filling aside.

5) Grease the baking pan with olive oil. Place caps at the baking cap and brush with a little olive oil.

6) Put around 1 tablespoon of filling onto each cap and top up with cheese.

7) Put baking pan with the stuffed mushrooms into the oven and bake for 15 to 20 minutes or until cheese slightly browned.


Outcome:

It is yummy! I was urged to take out the mushrooms from the oven earlier as we were already half way through our dinner and it would have become our dessert if we waited any longer. The cheese has melted but both of us agreed that it would have tasted much better if it was baked longer for the cheese to brown. I am very satisfied with the outcome as this is a creation of my own version of baked stuffed mushroom and it turned out rather pleasing!

Saturday, November 8, 2008

Glutinous Rice Ball Soup (Tang Yuan)

Glutinous Rice Ball soup or "Tang Yuan" is traditionally eaten during "Dong Zhi" celebration by Chinese. "Dong Zhi" is celebrated every year following the Chinese lunar calendar and simply means and marks the start of winter season. The round rice balls are a symbol of sweet reunion, harmony and unity within the family.

It is a simple dessert and it can be commonly found in Singapore. Basic "Tang Yuan" consists only rice balls/ dumplings and sweet syrup. I used to eat this type of "Tang Yuan" cooked by my mum when I was young.

Some people might add in different fillings (red bean, sesame, peanut paste & etc) or colouring to the rice balls to make them more appetizing and flavourful. There is even a variety of soup (peanut soup, sesame soup, red bean soup & etc) to go with these rice balls. The combination of these different types of rice balls and soups makes it a more interesting dessert.
A week back, I found a very interesting glutinous rice ball soup recipe whereby the skin is made by swirling the filling in a bowl of glutinous rice flour, layer by layer. Normally, the skin is made by adding to the water to the flour to form a dough. The dough is rolled and then the filling is wrap with the dough skin. Hence, I thought i should give it a try although I find it involves a lot of steps and patience just to make the skin of a single ball.

Other than that, I modified the syrup as I do not have brown sugar and mandarin orange peel at home. I just substituted those with cane sugar and omitting orange peel from my syrup.


Ingredients:
(yields 2 cups, 10 rice balls)

Glutinous rice balls
1 1/2 tbs peanut butter (I used crunchy type)
1 tbs sesame powder
1 tbs icing sugar
1 1/2 tbs roasted sesame seeds
200 g glutinous rice flour

Syrup
1/2 piece ginger (I used 4 slices as I liked more ginger taste in my soup)
75 g brown sugar (I used cane sugar and I reduced the amount to suit my taste)
1/2 piece mandarin orange peel
2 cups water


Method:

1) Mix well of peanut butter, instant sesame powder and icing sugar. Form the mixture into 10 small pieces and roll them into balls.
2) Roll and coat the balls individually with roasted sesame seeds. This is the filling.

3) Chill the filling in the fridge for at least 15 minutes.

4) To form the skin, roll a chilled filling into a bowl of glutinous rice flour. Make sure it is well coated.

5) Dip it into cold water for 1 second and then put it back into the bowl of flour and swirl it in the bowl to coat it with another layer of flour. Repeat this 10 times so that it becomes double the size of the filling. Make sure it does not crack.

6) Boil a pot of water. Once boiling, dump in the rice balls. Boil for another 5 minutes when rice balls are floating.

7) To prepare the syrup, dump in ginger, sugar and mandarin orange peel into 2 cups of water and bring it to boil.

8) To serve, scoop rice balls from water and put into syrup.

Recipe adapted from Chow Times


Outcome:

The filling is not similar to those hot spilling paste filling as normally sold in the stalls. It is solid. Somehow, it is something that I did not expect of. However, the combination of the solid filling and soft skin tasted special and is quite good. The only let down to this was the syrup. It tasted fine when taking it alone, but when combined with the rice balls, it tasted quite bland. It's entirely my fault as I reduced the amount of sugar needed. I will follow the sugar amount as stated above next time. Overall, it is an enjoyable experience and we also enjoyed having this as a dessert during tea break.

Sunday, November 2, 2008

Asparagus Cream Soup

Long time ago, I coaxed my boyfriend and pleaded him to let me buy a blender. I promised to blend us various fruit juices and also to cook him asparagus cream soup as a reward. It is already almost 2 years since I acquired the blender of which it is kept in the cabinet, not frequently used and not even cook the asparagus soup a single time!

Today, I get a request from him to cook the asparagus cream soup out of a sudden when we were shopping at the vegetable stalls. It should be the various stalks of asparagus lying at the stalls that captured his attention. He remembered the promise I made!

I've tried quite a number of times cooking this soup a few years back at home but it was really not much appreciated by my family. Hence, it did made me hesitated for a while whether to comply and fulfill his wish. In the end, I decided to accept the challenge and grab a bunch of asparagus from the stall. He was pleased!

I managed to searched a few of recipes available online and decided on this recipe from this site. It is a clear step by step recipe in video format. It requires quite a number of steps like preparing the stock for the soup base, blending, stir fry and simmering, I am thankful that it is not difficult to follow the video recipe.


Outcome:

Overall, it tasted very good, though it was not as thick and as creamy as it should be. That was definitely my fault as I added more water half way through boiling the stock as I thought the portion might not be enough for the 2 of us. Besides, I also reduced the amount of cream that the recipe called for. Nevertheless, if follow strictly to the original recipe and with sufficient salt added to this soup, could almost match the standards of asparagus soup sold in Ikea! That was how we fell in love with asparagus soup when we tried this soup at Ikea a few years back.

Vegetable Pizza

I am making pizza again! Yup! This is my 2nd attempt of making pizza just after last week's failed thick pizza crust. I am hoping to succeed in making a thinner crust pizza. Besides the crust, I also would like to incorporate some vegetables as toppings so it is much more healthy.

This week, I am going to follow the ingredients from a recipe book called "The Easy Way to Artisan Breads & Pastries" which I borrowed from the library 2 weeks ago to make the dough. For those who does not own a bread maker, this is a good book as it teaches you how to use a stand electric mixer to knead the dough instead of kneading it on your own. It contains various colourful illustrations and the steps are so well described, you will not have difficulties understanding them. I am using a bread maker to make the pizza dough.

For the pizza recipe in this book, it also offers a no-cook pizza tomato sauce to go with the pizza dough, though I just used the pizza sauce I bought a week ago from the hypermarket. I guess I will try out the pizza sauce from this recipe book the next time I make pizza again, may be next week :)

As usual, I am reducing the quantity that the original recipe by halve to suit for 2 persons.


Ingredients:
(yields 1 30cm pizza)

1/4 cup cold milk
1/4 cup water
1/2 tbs extra-virgin olive oil (I used pure olive oil)
1 1/2 cup bread flour
1 tbs sugar
1 tsp salt
1 tsp dry yeast
Extra olive oil (greasing the baking pan & for the crust before baking)

Toppings:

70 g Pizza sauce (I used Ardmona Pizza sauce)
1/2 Capsicum (Sliced thinly)
4 buttons Shiitake mushroom (Sliced thinly, stalk removed)
1/2 head onion (Sliced thinly)
Grated Mozzarella Cheese (I used Perfect Italiano Pizza Plus)

Method:

1. Pour in the ingredients except salt into the standing electric mixer bowl with the dough hook attached. Mix under low speed for 5 minutes. Add salt and switch to medium speed for additional 10 minutes. Let rise in a floured bowl and covered with cling wrap/ wet cloth for 1 hour.

OR

Dump in the ingredients according to the list above into the bread maker, select the 'Dough' function and wait until the kneading & rising cycle completes.

2. Once complete rising, transfer the dough onto a floured flat surface and give a light kneading to remove the gas from the dough. Let it rise, uncovered for 10 minutes.

3. Preheat oven at 200 degree Celsius.

4. Press the dough into greased, 30 cm pizza pan. I had my baking tray lined with aluminium foil. Try to stretch the dough outwards. Alternatively, you could use a floured rolling pin and roll the dough into 1/8 inch-thick pizza dough.

5. Brush the crust with olive oil.

6. Immediately, spoon pizza sauce over dough, top with cheese and toppings.

7. Bake for 25-30 minutes or until cheese is bubbly and crust is golden brown.

Ingredients and partial recipe is adapted from "The Easy Way to Artisan Breads & Pastries"


Outcome:


It is very successful this time! Everything tasted perfectly and I even get a remark that it is almost similar to Pizza Hut's standard! Though, I still failed at achieving the thin crust standard like Spizza or Sarpinos Pizza, we are more than satisfied with the outcome this time around. When we munched the side of the pizza, to our delight, it is crunchy and crispy! Very, very delicious! I would definitely make pizza using this dough recipe again and again until I found a better one!

Friday, October 31, 2008

Simple cabbage soup

I think soup is the most easy yet nutritious dish as you just need to prepare the ingredients and dump them in a pot and wallah~! a hot, steamy nutritious soup that goes so well with rice. While the soup is boiling, you could also start attending to your other dish. I was taking pictures on my other dish (Ants Climbing the Tree) while the soup boiled in the kitchen. :)


Ingredients:
(yields 1 bowl, ard 800 ml)

4-5 leaves Chinese cabbage
1 handful anchovies
1 tsp of garlic (minced)
1 tsp of dried shrimp
1 tsp of ginger (minced)
1 tsp of vegetable oil
salt & pepper to taste
a dash of sesame oil


Method:

1) Wash and drain all the ingredients above (except salt and pepper)

2) Cut cabbage in pieces, about 1 inch size. Mince garlic and ginger.

3) Heat pot (i used metal pot) with oil under medium heat. Pour in anchovies, garlic, dried shrimp and ginger and stir fry until fragrant.

4) Pour in the water, cover with lid and wait until it start to boil.

5) Add in the cabbage and let it boil for 10-15 minutes.

6) Sprinkle with sesame oil, salt & pepper to taste.

7) Scoop into a bowl.

Outcome:


My boyfriend definitely prefers this soup over the other dish (Ants Climbing the Tree) as he helped me cleared the whole bowl of soup. You can try substituting the cabbage with other vegetables for this soup by omitting the ginger. I tried with baby spinach and was equally satisfied with this simple and delicious soup.

Thursday, October 30, 2008

Ants Climbing the Tree (without ants version)

For the past few days, I have been cooking for dinner for the two of us at home as we think it is healthier and we are sick of packing and eating the same food everyday from this area. Since both of us are not very picky eaters, we are very happy to have very simple dishes everyday. Simple means 1 soup + 1 vegetable dish to go with rice.

Normally, the ingredients are prepared (soaking, washing, cutting & etc) a day ahead so that I can start cooking after I reach home from work. This definitely cut short the meal preparation time.

Today, I am cooking a dish named "Ants Climbing the Tree". This cuisine is mostly available in Chinese restaurants. I've always found this dish fantastic and very appetizing. It is a hot and spicy dish which originates from Szechuan, China. As the bits of meat are fried together with the mung bean vermicelli, the presentation resembles ants climbing up a tree.

However, I am going to skip the meat as both of us do not fancy eating meat.

Ingredients:
(2 persons)

2 tbsp vegetable oil
2 bundles dried mung bean noodles
1/2 small chili pepper (chopped)
1 tsp ginger (minced)
1 stalk chopped spring onion (cut in small rings)
1 dash sesame oil

Mixture of sauce (mixed ahead):
1 tsp sugar
1/2 tbsp rice wine
1 tsp spicy fermented bean paste
1 tbsp soya sauce
1/2 cup of chicken stock (I used water)

Method:

1. Soak the mung bean vermicelli in warm water for about 10 minutes. Drain well and cut into shorter lengths (around 1 inch) and put aside.

2. Heat up the wok under medium heat and pour in the vegetable oil. Swirl the oil around the wok.

3. Add small chili pepper, ginger & spring onion to the wok and stir fry briefly until aromatic.

4. Stir in the mixture sauce and noodles. Let the noodles absorb the sauce. Keep tossing briefly around 2-3 minutes and then sprinkled with some sesame oil.

5. Dish up.


Outcome:

It did not come out as much as I wished it could. It was so different from the ones I have tried in the restaurants. Furthermore, the noodles lumped together and it was very dry. It was not spicy enough though the overall taste was OK. In the end, we managed to finish it as it was edible. I would not rate this dish very high but hope to improvise my skill and ingredients in future.

Monday, October 27, 2008

Easy Egg Tarts

I am in the mood of baking and cooking now. Whenever I find the time, I would vigorously browse for interesting recipes so that I could start on it. Sometimes, I found too many good recipes I have a hard time choosing which one to start with.

I came across an egg tart recipe last night and thought that I should give it a try since it looked quite simple and I have all the ingredients that the recipe called for. But above all, this is also one of my boyfriend's favourite pastry.


Ingredients:
(yields 10 tarts)

Crust
1 3/4 cup all purpose flour
3 tbsp sugar
1/4 tsp salt
1/2 cup butter (chilled)
1 large egg

Filling
1/2 cup sugar
4 large egg yolks
2/3 cup milk (I used fresh milk)
Method:
1) Preheat oven to 175 deg C.

2) For the crust, pulse to combine flour, sugar, salt & butter in a food processor until mixture is crumbly. As I do not own a food processor, I used stand mixer to do this.

3) Blend in the egg until the dough comes together into a dough. The dough can be crumbly.

4) Shape dough into a ball and put into a ziplock bag. Refrigerate for about 15 minutes.

5) Next is the filling. whisk together sugar and egg yolks by hand until sugar is mostly dissolved. Do not over stir until foamy.

6) Slowly, whisk in milk and strain mixture into a measuring cup.

7) Divide the chilled dough into 10 equal dough balls and press each one evenly into a muffin cup to form small tart shells.

8) Press pastry until it comes about 2/3 up the side of the muffin cup. Flatten the top edge of the crusts a bit with your finger to help prevent the filling from running out.

9) Pour the filling into the tart shells, filling them to the top but not overfilling.

10) Bake for 20-25 minutes, until tarts are set but still slightly jiggly in the center when the pan is shifted.
11) Cool for about 30 minutes in the pan.

12) Take tarts out from the muffin pan using a butter knife and place on a wire rack to cool completely.

Recipe adapted from http://www.bakingbites.com

Outcome:

For a first timer in making egg tarts, I am quite satisfied with the results. The egg surface is quite smooth and the taste is just right! The slightly salty but heavy butter crust when combined with the smooth sweet egg custard within the shell is simply delicious. I would definitely make more of these and give it to my friends and family :)

Sunday, October 26, 2008

Cheezy Pizza

My family and friends are crazy about thin crust pizzas especially my boyfriend. He can finish two 10 inches pizza on his own within 2 hours! He even indicated to me to concentrate my baking skills to only making pizzas since that is his favourite of all.

By looking at the variety pizza dough recipes on hand, it does not look complicated at all. Last night, I just followed the recipe provided in my bread maker machine and as usual, let the machine do the work of kneading and rising. However, when the dough is ready for me to do the shaping, it was in such a mess. The dough was too wet and sticky and so, so unmanageable. In the end, I just gave up and the whole thing ended up in the drain. It was such a let down.

This morning, I decided to modify the ingredients by reducing the amount of water. At least, this time around, the dough is much more better and manageable.


Ingredients:
(yields 2 ten inches pizzas)

3/4 cup water
1 tbsp olive oil
2 1/2 cup bread flour
1 tbsp sugar
1tsp salt
1 tsp dry active yeast
Toppings:
Pizza tomato sauce
Shredded mozzarella cheese
Vegetable oil


Method:

1) Dump all the ingredients according to the list above into the bread maker and select "Dough" function.

2) When the dough has completed, take out the dough with lightly floured hands and shape dough into a ball on a floured flat surface.

3) Divide the dough into half. Press each dough into greased 30 cm pizza pan.

4) Brush crust with vegetable oil. Cover and let stand for 10-15 minutes.

5) Spoon pizza tomato sauce over dough and top generously with cheese and toppings of your choice.

6) Bake in preheated oven at 200 deg. C for 25-30 minutes or until cheese is bubbly and crust is golden brown.

Outcome:


Although the dough is meant for thin crust pizza, somehow to my disappointment, it came out 1.5-2 cm thick. Other than the thickness, the pizzas tasted not bad. The generous pizza sauce and cheese is enough to compensate the thick bread crust ;)